Tkinter Python basic examples
last modified January 30, 2024
In this article we show how to create simple GUI applications in Tkinter using procedural programming style.
Tkinter
Tkinter is a Python binding to the Tk GUI toolkit. Tk is the original GUI library for the Tcl language. Tkinter is implemented as a Python wrapper around a complete Tcl interpreter embedded in Python.
Tkinter is part of the Python standard installation.
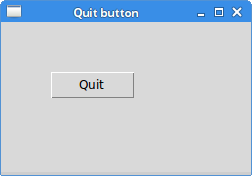
Tkinter quit button
The Button widget is a standard Tkinter widget that
is used to execute an action.
#!/usr/bin/python

import tkinter

root = tkinter.Tk()
root.title('Quit button')

btn = tkinter.Button(root, text="Quit", width=8,
    command=root.quit)
btn.pack(pady=10)

root.geometry("300x250+300+300")
root.mainloop()
The example creates a quit button. When the button is clicked, the application terminates.
import tkinter
We import the tkinter module.
root = tkinter.Tk()
A root window is created. The root window is a main application window in our applications. It has a title bar and borders. These are provided by the window manager. The root window must be created before any other widgets.
root.title('Quit button')
With the title method, we set the title of the window.
btn = tkinter.Button(root, text="Quit", width=8,
    command=root.quit)
A Button widget is created. The first parameter of the
button constructor is the parent widget; it is the root window.
The text parameter specifies the label of the button.
The width sets the width of the button. The command
parameter specifies the function that is executed when the button
is clicked. The root.quit terminates the application.
btn.pack(pady=10)
The pack is one of the three layout managers in Tkinter.
It places the button on the parent and displays it. The pady
places some space above and below the button.
root.geometry("300x250+300+300")
The geometry method sets a size for the window and
positions it on the screen. The first two parameters are the width and
height of the window. The last two parameters are x and y screen coordinates.
root.mainloop()
Finally, we enter the mainloop. The mainloop receives events from the
window system and dispatches them to the application widgets. It is
terminated when we click on the close button of the titlebar or
call the quit method.
Tkinter center window
With the geometry method, we center the application window
on the screen.
#!/usr/bin/python

import tkinter

root = tkinter.Tk()
root.title('Centered window')

win_width = 300
win_height = 250

screen_width = root.winfo_screenwidth()
screen_height = root.winfo_screenheight()

start_x = int((screen_width/2) - (win_width/2))
start_y = int((screen_height/2) - (win_height/2))

root.geometry('{}x{}+{}+{}'.format(win_width, win_height,
    start_x, start_y))
root.mainloop()
In order to center a window on a screen we need to know the dimensions of the screen and the window.
win_width = 300
win_height = 250
This is the width and height of the window.
screen_width = root.winfo_screenwidth()
screen_height = root.winfo_screenheight()
We get the width and height of the screen with winfo_screenwidth
and winfo_screenheight methods.
start_x = int((screen_width/2) - (win_width/2))
start_y = int((screen_height/2) - (win_height/2))
We calculate the x and y coordinates of the top-left corner of the window.
root.geometry('{}x{}+{}+{}'.format(win_width, win_height,
    start_x, start_y))
We place the window on the screen with geometry.
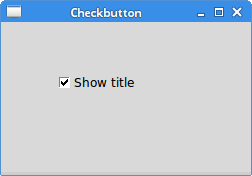
Tkinter Checkbutton
Checkbutton is a widget that has two states: on and off.
The on state is visualized by a check mark.
A Checkbutton is associated with a variable. The variable
stores the current state of the button (on or off).
#!/usr/bin/python

import tkinter

def toggleTitle():

    isTitleShown = cbvar.get()

    if isTitleShown:
        root.title('Checkbutton example')
    else:
        root.title('')

root = tkinter.Tk()
root.title('Checkbutton example')

cbvar = tkinter.BooleanVar()
cbtn = tkinter.Checkbutton(root, text="Show", width=8, variable=cbvar,
    command=toggleTitle)
cbtn.select()
cbtn.pack(pady=10)

root.geometry("300x250+300+300")
root.mainloop()
A Checkbutton is located on the window. It shows or hides
the title of the window.
def toggleTitle():

    isTitleShown = cbvar.get()

    if isTitleShown:
        root.title('Checkbutton example')
    else:
        root.title('')
The toggleTitle function toggles the title of the window.
We get the state of the Checkbutton from the associated
cbvar. Depending on its state, we show or hide the title
with title.
cbvar = tkinter.BooleanVar()
A BooleanVar is created.
cbtn = tkinter.Checkbutton(root, text="Show", width=8, variable=cbvar,
    command=toggleTitle)
A Checkbutton is created. The variable parameter
sets the associated variable. The command parameter determines
the function which is called when the Checkbutton is selected
or deselected.
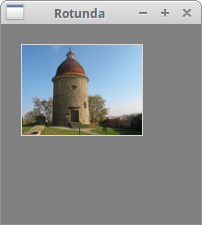
Tkinter Label
Label is a standard widget that can show either text or
images.
In order to work with images, we need to install pillow
module.
$ pip3 install pillow
We install the module with pip.
#!/usr/bin/python

import tkinter
from PIL import Image, ImageTk

root = tkinter.Tk()
root.configure(background='gray')
root.title("Rotunda")

rot_i = Image.open("rotunda.jpg")
rotunda = ImageTk.PhotoImage(rot_i)

label = tkinter.Label(image=rotunda)
label.image = rotunda
label.place(x=20, y=20)

root.mainloop()
Our example displays a JPG image.
from PIL import Image, ImageTk
The Label widget can display only a limited set of image types. To
display a JPG image, we must use the PIL, Python Imaging Library module.
root.configure(background='gray')
We change the background colour of the main window to gray colour with
configure.
rot_i = Image.open("rotunda.jpg")
We create an Image from the image file which is located in
the current working directory.
rotunda = ImageTk.PhotoImage(rot_i)
A photo image is created from the image.
label = tkinter.Label(image=rotunda)
The photoimage is given to the image parameter of the label widget.
label.image = rotunda
The image reference must be stored in order for the image not to be garbage collected.
label.place(x=20, y=20)
We place the image on the window using absolute coordinates with
the place method.
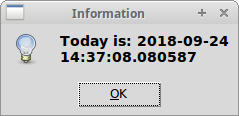
Tkinter Message box
A message box is a small dialog window that shows warnings, errors, or information.
#!/usr/bin/python

import tkinter
import tkinter.messagebox
import datetime

def showDate():

    now = datetime.datetime.now()
    msg = 'Today is: {}'.format(now)
    tkinter.messagebox.showinfo("Information", msg)

root = tkinter.Tk()
root.title('Message box')

btn = tkinter.Button(root, text="Show date", padx=5, pady=5, width=10,
    command=showDate)
btn.pack(pady=10)

root.geometry('300x300+300+250')
root.mainloop()
In this example, we show an information message box. The box is shown when we click on a button.
import tkinter.messagebox
Methods to invoke message boxes are in tkinter.message
module.
def showDate():

    now = datetime.datetime.now()
    msg = 'Today is: {}'.format(now)
    tkinter.messagebox.showinfo("Information", msg)
The showDate method displays the message box. The dialog
window displays the current date and time. The tkinter.messagebox.showinfo
displays the information message box.
btn = tkinter.Button(root, text="Show date", padx=5, pady=5, width=10,
    command=showDate)
Clicking on the button the showDate method is called.
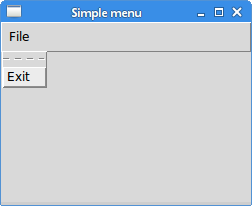
Tkinter Menu
A menubar is a group of commands located in various menus. Menus group commands that we can use in an application.
#!/usr/bin/python

import tkinter
import tkinter.messagebox
import datetime

def showDay():

    now = datetime.datetime.now()
    msg = 'Today is: {}'.format(now.strftime('%A'))
    tkinter.messagebox.showinfo("Information", msg)

root = tkinter.Tk()
root.title('Menu')

menubar = tkinter.Menu(root)
root.config(menu=menubar)

fileMenu = tkinter.Menu(menubar)

fileMenu.add_command(label="Show day", command=showDay)
fileMenu.add_command(label="Exit", command=root.quit)

menubar.add_cascade(label="File", menu=fileMenu)

root.geometry('300x200+300+250')
root.mainloop()
The example creates a File menu with two options: Show day and Exit.
def showDay():

    now = datetime.datetime.now()
    msg = 'Today is: {}'.format(now.strftime('%A'))
    tkinter.messagebox.showinfo("Information", msg)
The showDay displays a dialog box showing the current
day.
menubar = tkinter.Menu(root)
root.config(menu=menubar)
A menubar is created. It is a regular Menu widget configured to be the menubar of the root window.
fileMenu = tkinter.Menu(menubar)
A file menu object is created. A menu is a drop-down window containing commands.
fileMenu.add_command(label="Show day", command=showDay)
fileMenu.add_command(label="Exit", command=root.quit)
We add two options with the add_command method.
The command attribute specifies the function to be called
when the menu option is selected.
menubar.add_cascade(label="File", menu=fileMenu)
With the add_cascade method, the File menu is added to
the menubar.
Tkinter popup menu
Popup menu, also called a context menu, is a menu that can be shown anywhere on the client area of a window.
#!/usr/bin/python

import tkinter
import tkinter.messagebox
import datetime

def showDay():

    now = datetime.datetime.now()
    msg = 'Today is: {}'.format(now.strftime('%A'))
    tkinter.messagebox.showinfo("Information", msg)

def showMenu(e):

    pmenu.post(e.x_root, e.y_root)

root = tkinter.Tk()
root.title('popup menu')

pmenu = tkinter.Menu(root, tearoff=0)

pmenu.add_command(label="Show day", command=showDay)
pmenu.add_command(label="Exit", command=root.quit)

root.bind("<Button-3>", showMenu)

root.geometry('300x250+300+250')
root.mainloop()
In the example we create a popup menu with two commands.
pmenu = tkinter.Menu(root, tearoff=0)
A context menu is a regular Menu widget. The tearoff feature
is turned off. Now it is not possible to separate the menu into a new toplevel window.
root.bind("<Button-3>", showMenu)
We bind the <Button-3> event type to the showMenu
callb. The event is generated when we right click on the client area
of the window.
def showMenu(e):

    pmenu.post(e.x_root, e.y_root)
The showMenu method shows the context menu. The popup menu
is shown at the x and y coordinates of the mouse click.

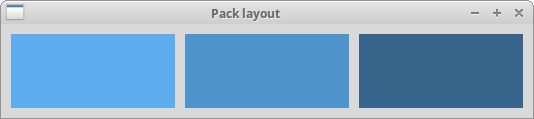
Tkinter pack layout manager
The pack geometry manager packs widgets in rows or columns. We
can use options such as fill, expand,
padx, pady, and side to control
the layout.
#!/usr/bin/python

import tkinter

root = tkinter.Tk()
root.title('Pack layout')

lbl1 = tkinter.Label(root, width=20, height=5, bg='SteelBlue2')
lbl1.pack(side=tkinter.LEFT, padx=10, pady=10)

lbl2 = tkinter.Label(root, width=20, height=5, bg='SteelBlue3')
lbl2.pack(side=tkinter.LEFT)

lbl3 = tkinter.Label(root, width=20, height=5, bg='SteelBlue4')
lbl3.pack(side=tkinter.LEFT, padx=10)

root.geometry('+300+250')
root.mainloop()
In this example, we lay out three labels in a row.
lbl1.pack(side=tkinter.LEFT, padx=10, pady=10)
With the side option we pack the widgets into one row.
The padx adds some horizontal space. The pady
adds some vertical space.
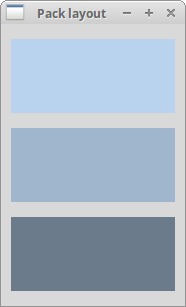
In the second example, we place widgets into a column.
#!/usr/bin/python

import tkinter

root = tkinter.Tk()
root.title('Pack layout')

lbl1 = tkinter.Label(root, width=20, height=5, bg='SlateGray2')
lbl1.pack(side=tkinter.TOP, pady=15, padx=10)

lbl2 = tkinter.Label(root, width=20, height=5, bg='SlateGray3')
lbl2.pack(side=tkinter.TOP, padx=10)

lbl3 = tkinter.Label(root, width=20, height=5, bg='SlateGray4')
lbl3.pack(side=tkinter.TOP, pady=15, padx=10)

root.geometry('+300+250')
root.mainloop()
The example puts three labels into a column.
lbl1.pack(side=tkinter.TOP, pady=15, padx=10)
To put labels into a column, we set the side option to
tkinter.TOP.
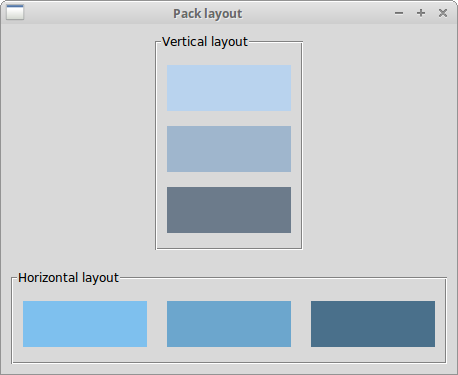
In the third example, we create a row of labels and a column of labels with pack manager.
#!/usr/bin/python

import tkinter

root = tkinter.Tk()
root.title('Pack layout')

frame1 = tkinter.LabelFrame(root, text='Vertical layout',
    relief=tkinter.GROOVE)

lbl1 = tkinter.Label(frame1, width=15, height=3, bg='SlateGray2')
lbl1.pack(side=tkinter.TOP, pady=15, padx=10)

lbl2 = tkinter.Label(frame1, width=15, height=3, bg='SlateGray3')
lbl2.pack(side=tkinter.TOP, padx=10)

lbl3 = tkinter.Label(frame1, width=15, height=3, bg='SlateGray4')
lbl3.pack(side=tkinter.TOP, pady=15, padx=10)

frame1.pack(pady=10)

frame2 = tkinter.LabelFrame(root, text='Horizontal layout',
    relief=tkinter.GROOVE)

lbl4 = tkinter.Label(frame2, width=15, height=3, bg='SkyBlue2')
lbl4.pack(side=tkinter.LEFT, pady=15, padx=10)

lbl5 = tkinter.Label(frame2, width=15, height=3, bg='SkyBlue3')
lbl5.pack(side=tkinter.LEFT, padx=10)

lbl6 = tkinter.Label(frame2, width=15, height=3, bg='SkyBlue4')
lbl6.pack(side=tkinter.LEFT, pady=15, padx=10)

frame2.pack(padx=10, pady=10)

root.geometry('+300+250')
root.mainloop()
We create two LabelFrame widgets. These will contain
the labels. The frames themselves are packed into a column.
frame1 = tkinter.LabelFrame(root, text='Vertical layout',
    relief=tkinter.GROOVE)

lbl1 = tkinter.Label(frame1, width=15, height=3, bg='SlateGray2')
lbl1.pack(side=tkinter.TOP, pady=15, padx=10)

lbl2 = tkinter.Label(frame1, width=15, height=3, bg='SlateGray3')
lbl2.pack(side=tkinter.TOP, padx=10)

lbl3 = tkinter.Label(frame1, width=15, height=3, bg='SlateGray4')
lbl3.pack(side=tkinter.TOP, pady=15, padx=10)

frame1.pack(pady=10)
The first LabelFrame contains a column of three labels.
frame2 = tkinter.LabelFrame(root, text='Horizontal layout',
    relief=tkinter.GROOVE)

lbl4 = tkinter.Label(frame2, width=15, height=3, bg='SkyBlue2')
lbl4.pack(side=tkinter.LEFT, pady=15, padx=10)

lbl5 = tkinter.Label(frame2, width=15, height=3, bg='SkyBlue3')
lbl5.pack(side=tkinter.LEFT, padx=10)

lbl6 = tkinter.Label(frame2, width=15, height=3, bg='SkyBlue4')
lbl6.pack(side=tkinter.LEFT, pady=15, padx=10)

frame2.pack(padx=10, pady=10)
The second LabelFrame contains a row of three labels.
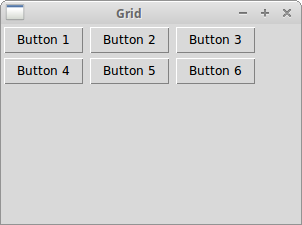
Tkinter grid layout manager
The grid layout manager organizes its children in a two-dimensional grid. The grid consists of columns and rows. The intersections of columns and rows are called cells.
#!/usr/bin/python

import tkinter

root = tkinter.Tk()
root.title('Grid')

root.columnconfigure(0, pad=5)
root.columnconfigure(1, pad=5)
root.columnconfigure(2, pad=5)
root.rowconfigure(0, pad=5)

btn1 = tkinter.Button(root, text='Button 1')
btn1.grid(column=0, row=0)

btn2 = tkinter.Button(root, text='Button 2')
btn2.grid(column=1, row=0)

btn3 = tkinter.Button(root, text='Button 3')
btn3.grid(column=2, row=0)

btn4 = tkinter.Button(root, text='Button 4')
btn4.grid(column=0, row=1)

btn5 = tkinter.Button(root, text='Button 5')
btn5.grid(column=1, row=1)

btn6 = tkinter.Button(root, text='Button 6')
btn6.grid(column=2, row=1)

root.geometry('300x300+300+250')
root.mainloop()
In the example, we place six buttons in a grid.
root.columnconfigure(0, pad=5)
root.columnconfigure(1, pad=5)
root.columnconfigure(2, pad=5)
root.rowconfigure(0, pad=5)
With columnconfigure and rowconfigure
methods we add some space between the rows and columns.
btn1.grid(column=0, row=0)
The grid method places the widget into the grid.
The column and row attributes specify the
indexes of the cell. This button is placed into the top-left cell
of the grid.
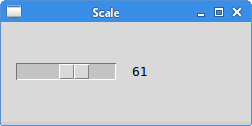
Tkinter Scale
The Scale widget allows the user to select a numerical value by moving a knob along a scale. We can control the minimum and maximum values and the resolution.
#!/usr/bin/python

import tkinter

def onScale(val):

    v = int(val)
    lvar.set(v)

root = tkinter.Tk()
root.title('Scale example')

root.columnconfigure(0, pad=5)
root.columnconfigure(1, pad=15)
root.rowconfigure(0, pad=5)

scale = tkinter.Scale(root, from_=0, to=100, orient=tkinter.HORIZONTAL,
    command=onScale)
scale.grid(column=0, row=0)

lvar = tkinter.IntVar()
label = tkinter.Label(root, text=0, textvariable=lvar)
label.grid(column=1, row=0)

root.geometry("300x220+300+300")
root.mainloop()
In the code example we have a Scale and a Label.
The value selected with the Scale is shown in the adjacent
Label. The layout is created with the grid manager.
def onScale(val):

    v = int(val)
    lvar.set(v)
The onScale method is called when we move the knob of
the Scale. We get the current value of the scale and set it to the
label's associated variable.
scale = tkinter.Scale(root, from_=0, to=100, orient=tkinter.HORIZONTAL,
    command=onScale)
The Scale widget is created. We specify the initial and
ending values, the orientation and the callback function.
lvar = tkinter.IntVar()
label = tkinter.Label(root, text=0, textvariable=lvar)
This is the label that shows the scale's selected value.
Tkinter key press event
A key press event is generated when the user presses a keyboard key.
We use the bind method to map an event type to the
event handler. The event type for a key event is <Key>.
#!/usr/bin/python

import tkinter

def onKeyPress(e):

    msg = 'Key {}, (code {}) was pressed'.format(e.keysym, e.keycode)
    lvar.set(msg)

root = tkinter.Tk()
root.title('Key event')

lvar = tkinter.StringVar()
lbl = tkinter.Label(root, text="coordinates", textvariable=lvar)
lbl.place(x=20, y=20)

root.bind('<Key>', onKeyPress)

root.geometry("300x250+300+300")
root.mainloop()
In the example, we show the key event properties of a pressed key in a label widget.
def onKeyPress(e):

    msg = 'Key {}, (code {}) was pressed'.format(e.keysym, e.keycode)
    lvar.set(msg)
The onKeyPress is an event handler for the key press event.
We show the key symbol and key code of the pressed key in the label widget.
root.bind('<Key>', onKeyPress)
We bind the <Key> event type to the onKeyPress
event handler.
Tkinter mouse move event
The event type for a mouse move event is <Motion>.
#!/usr/bin/python

import tkinter

def onMotion(e):

    msg = 'x: {} y: {}'.format(e.x, e.y)
    lvar.set(msg)

root = tkinter.Tk()
root.title('Mouse move event')

lvar = tkinter.StringVar()
lbl = tkinter.Label(root, text="coordinates", textvariable=lvar)
lbl.place(x=20, y=20)

root.bind('<Motion>', onMotion)

root.geometry("300x250+300+300")
root.mainloop()
The example shows the coordinates of the current mouse pointer in the label widget.
def onMotion(e):

    msg = 'x: {} y: {}'.format(e.x, e.y)
    lvar.set(msg)
In the onMotion callback, we get the x and y coordinates
of the mouse pointer, form a text message and set it to the label's
associated variable.
root.bind('<Motion>', onMotion)
We bind the <Motion> event type to the onMotion
callback.
Tkinter jumping button
The following example is a small teaser application that utilizes the <Enter> event type. The enter event is generated when the user enters a widget with a mouse pointer.
#!/usr/bin/python

import tkinter
import random

def onEnterButton(e):

    w = root.winfo_width()
    h = root.winfo_height()

    b_w = btn.winfo_width()
    b_h = btn.winfo_height()

    r_x = random.randrange(0, w - b_w)
    r_y = random.randrange(0, h - b_h)

    btn.place(x=r_x, y=r_y)


root = tkinter.Tk()
root.title('Jumping button')
root.resizable(False, False)

btn = tkinter.Button(root, text='Exit', width=10, command=root.quit)
btn.place(x=180, y=20)

btn.bind('<Enter>', onEnterButton)

root.geometry("600x600+30+30")
root.mainloop()
The user tries to click the button, which should terminate the application. The button evades the click by randomly jumping from the mouse pointer.
def onEnterButton(e):

    w = root.winfo_width()
    h = root.winfo_height()

    b_w = btn.winfo_width()
    b_h = btn.winfo_height()

    r_x = random.randrange(0, w - b_w)
    r_y = random.randrange(0, h - b_h)

    btn.place(x=r_x, y=r_y)
The onEnterButton function is called when the user
enters the button area. We determine the dimensions of the root window
and the button. Then we use these values to randomly relocate the button
on the window area. The button is displayed with the place
method using absolute coordinates.
root.resizable(False, False)
We make it harder for the user by not allowing the window to resize.
btn = tkinter.Button(root, text='Exit', width=10, command=root.quit)
The button's command attribute is set to the root's quit
method. If the user manages to click the button, the window is terminated.
btn.bind('<Enter>', onEnterButton)
We bind the <Enter> event type to the onEnterButton
callback.
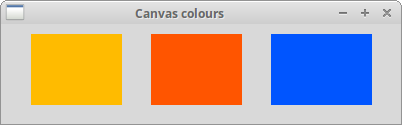
Tkinter Canvas colours
Drawing in Tkinter is done on the Canvas widget.
Canvas is a high-level facility for doing graphics in Tkinter.
#!/usr/bin/python

import tkinter

root = tkinter.Tk()
root.title('Canvas colours')

canvas = tkinter.Canvas(root)
canvas.create_rectangle(30, 10, 120, 80,
    outline="#fb0", fill="#fb0")
canvas.create_rectangle(150, 10, 240, 80,
    outline="#f50", fill="#f50")
canvas.create_rectangle(270, 10, 370, 80,
    outline="#05f", fill="#05f")
canvas.pack(fill=tkinter.BOTH, expand=1)

root.geometry("400x100+300+300")
root.mainloop()
The example displays three rectangles filled in three different colours.
canvas = tkinter.Canvas(root)
The Canvas widget is created.
canvas.create_rectangle(30, 10, 120, 80,
    outline="#fb0", fill="#fb0")
A rectangle is created with the create_rectangle method.
The first four parameters are the x and y
coordinates of the two bounding points: the top-left and bottom-right
points. With the outline parameter we control the colour of
the outline of the rectangle. Likewise, the fill parameter
provides a colour for the inside of the rectangle.
Source
In this article we have created GUI applications in Python with Tkinter using procedural style programming.