Menus & toolbars in Tkinter
last modified January 30, 2024
In this article work with menus and toolbar.
A menubar is part of a classic UI of an application. It is a group of commands located in various menus. We have most of the commands grouped into logical parts. There are accepted standards that further reduce the amount of time spending to learn a new application. Menus group commands that we can use in an application. Toolbars provide a quick access to the most frequently used commands.
Tkinter simple menu
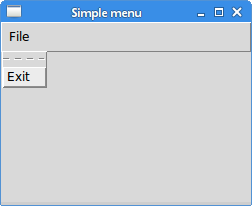
The first example shows a simple menu.
#!/usr/bin/python

from tkinter import Tk, Frame, Menu

class Example(Frame):

    def __init__(self):
        super().__init__()

        self.initUI()


    def initUI(self):

        self.master.title("Simple menu")

        menubar = Menu(self.master)
        self.master.config(menu=menubar)

        fileMenu = Menu(menubar)
        fileMenu.add_command(label="Exit", command=self.onExit)
        menubar.add_cascade(label="File", menu=fileMenu)


    def onExit(self):

        self.quit()


def main():

    root = Tk()
    root.geometry("250x150+300+300")
    app = Example()
    root.mainloop()


if __name__ == '__main__':
    main()
Our example will show a menu with one item. By selecting the exit menu item we close the application.
menubar = Menu(self.master)
self.master.config(menu=menubar)
Here we create a menubar. It is a regular Menu widget configured
to be the menubar of the root window.
fileMenu = Menu(menubar)
We create a file menu object. A menu is a drop-down window containing commands.
fileMenu.add_command(label="Exit", command=self.onExit)
We add a command to the file menu. The command will call the
onExit() method.
menubar.add_cascade(label="File", menu=fileMenu)
The file menu is added to the menubar using the add_cascade()
method.

Tkinter submenu
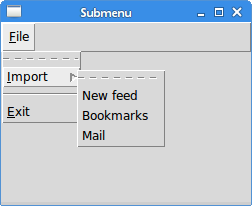
A submenu is a menu plugged into another menu object. The next example demonstrates this.
#!/usr/bin/python

from tkinter import Tk, Frame, Menu

class Example(Frame):

    def __init__(self):
        super().__init__()

        self.initUI()


    def initUI(self):

        self.master.title("Submenu")

        menubar = Menu(self.master)
        self.master.config(menu=menubar)

        fileMenu = Menu(menubar)

        submenu = Menu(fileMenu)
        submenu.add_command(label="New feed")
        submenu.add_command(label="Bookmarks")
        submenu.add_command(label="Mail")
        fileMenu.add_cascade(label='Import', menu=submenu, underline=0)

        fileMenu.add_separator()

        fileMenu.add_command(label="Exit", underline=0, command=self.onExit)
        menubar.add_cascade(label="File", underline=0, menu=fileMenu)


    def onExit(self):

        self.quit()


def main():

    root = Tk()
    root.geometry("250x150+300+300")
    app = Example()
    root.mainloop()


if __name__ == '__main__':
    main()
In the example, we have three options in a submenu of a file menu. We create a separator and keyboard shortcuts.
submenu = Menu(fileMenu)
submenu.add_command(label="New feed")
submenu.add_command(label="Bookmarks")
submenu.add_command(label="Mail")
We have a submenu with three commands. The submenu is a regular menu.
fileMenu.add_cascade(label='Import', menu=submenu, underline=0)
By adding the menu to the fileMenu and not to the menubar, we create
a submenu. The underline parameter creates a keyboard shortcut.
It provides the character position which should be underlined. In our case it is the
first. Positions start from zero. When we click on the File menu, a popup
window is shown. The Import menu has one character underlined. We can
select it either with the mouse pointer or with the Alt+I shortcut.
fileMenu.add_separator()
A separator is a horizontal line that visually separates menu commands. This way we can group items into some logical places.

Tkinter Popup menu
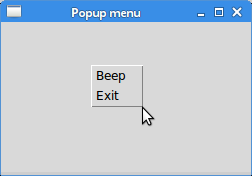
In the next example, we create a popup menu. Popup menu is also called a context menu. It can be shown anywhere on the client area of a window.
#!/usr/bin/python

from tkinter import Tk, Frame, Menu

class Example(Frame):

    def __init__(self):
        super().__init__()

        self.initUI()


    def initUI(self):

        self.master.title("Popup menu")
        self.menu = Menu(self.master, tearoff=0)
        self.menu.add_command(label="Beep", command=self.bell)
        self.menu.add_command(label="Exit", command=self.onExit)

        self.master.bind("<Button-3>", self.showMenu)
        self.pack()


    def showMenu(self, e):

        self.menu.post(e.x_root, e.y_root)


    def onExit(self):

        self.quit()


def main():

    root = Tk()
    root.geometry("250x150+300+300")
    app = Example()
    root.mainloop()


if __name__ == '__main__':
    main()
In our example, we create a popup menu with two commands.
self.menu = Menu(self.master, tearoff=0)
A context menu is a regular Menu widget. The
tearoff feature is turned off. Now it is not possible
to separate the menu into a new toplevel window.
self.master.bind("<Button-3>", self.showMenu)
We bind the <Button-3> event to the showMenu()
method. The event is generated when we right click on the client area
of the window.
def showMenu(self, e):

    self.menu.post(e.x_root, e.y_root)
The showMenu() method shows the context menu. The popup menu
is shown at the x and y coordinates of the mouse click.

Tkinter toolbar
Menus group commands that we can use in an application. Toolbars provide a quick access to the most frequently used commands. There is no toolbar widget in Tkinter.
#!/usr/bin/python

from PIL import Image, ImageTk
from tkinter import Tk, Frame, Menu, Button
from tkinter import LEFT, TOP, X, FLAT, RAISED


class Example(Frame):

    def __init__(self):
        super().__init__()

        self.initUI()


    def initUI(self):

        self.master.title("Toolbar")

        menubar = Menu(self.master)
        self.fileMenu = Menu(self.master, tearoff=0)
        self.fileMenu.add_command(label="Exit", command=self.onExit)
        menubar.add_cascade(label="File", menu=self.fileMenu)

        toolbar = Frame(self.master, bd=1, relief=RAISED)

        self.img = Image.open("exit.png")
        eimg = ImageTk.PhotoImage(self.img)

        exitButton = Button(toolbar, image=eimg, relief=FLAT,
            command=self.quit)
        exitButton.image = eimg
        exitButton.pack(side=LEFT, padx=2, pady=2)

        toolbar.pack(side=TOP, fill=X)
        self.master.config(menu=menubar)
        self.pack()


    def onExit(self):
        self.quit()


def main():

    root = Tk()
    root.geometry("250x150+300+300")
    app = Example()
    root.mainloop()


if __name__ == '__main__':
    main()
Our toolbar is on a frame on which we put a button.
toolbar = Frame(self.master, bd=1, relief=RAISED)
A toolbar is created. It is a Frame. We created a raised border
so that the boundaries of a toolbar are visible.
self.img = Image.open("exit.png")
eimg = ImageTk.PhotoImage(self.img)
Image and a photo image for the toolbar button are created.
exitButton = Button(toolbar, image=eimg, relief=FLAT,
    command=self.quit)
Button widget is created.
exitButton.pack(side=LEFT, padx=2, pady=2)
The toolbar is a frame and a frame is a container widget. We pack the button to the left side and add some padding.
toolbar.pack(side=TOP, fill=X)
The toolbar itself is packed to the top of the toplevel window; it is horizontally stretched.

Source
In this article we worked with menus and toolbars.